
Using your FTP Account via an FTP Client is a convenient way to upload and manage files, directories, and queue simultaneous file handling jobs at once. With the use of the SFTP Configuration file, FTP use is now made more secure.
It is a more efficient way to handle and manage files compared to using the File Manager from your browser. What is more is that you can upload larger file sizes.
Here’s a comprehensive guide in setting up FTP Client:
What is FTP?
“FTP” means “File Transfer Protocol.” It is basically a method of connecting two computers to each other in the most secure possible way to enable file transfer between two points or more. In this case, one of the “points” is the FTP Client you’ve installed on your PC, and the other “point” is your CLDY web hosting space. Using FTP then allows file transfers directly between your PC and your CLDY server, and vice versa.
How to Access Your FTP Account
1. Log in to your CLDY cPanel.
- Usually, the cPanel Web Address can be navigated to through your domain, in this format:
- https://yourdomain.com/cpanel
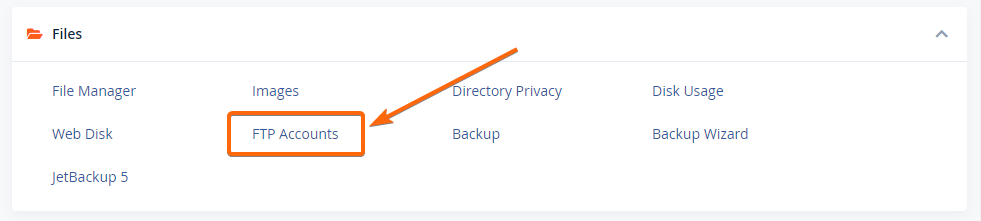
2. Go to Files and click on FTP Accounts.
3. Scroll down to the “Special FTP Accounts” to use the pre-populated Admin FTP Accounts:

4. Alternatively, you can also create a new FTP Account. You can do this on the same screen. Step to the next section to see how to do this.
How to Create Your FTP Account
Before you start setting up FTP client and managing your files, you have to create an FTP account first. Here’s how you do it:
1. On the FTP Accounts screen, you will see the Add FTP Account section up top. Fill in the required fields.
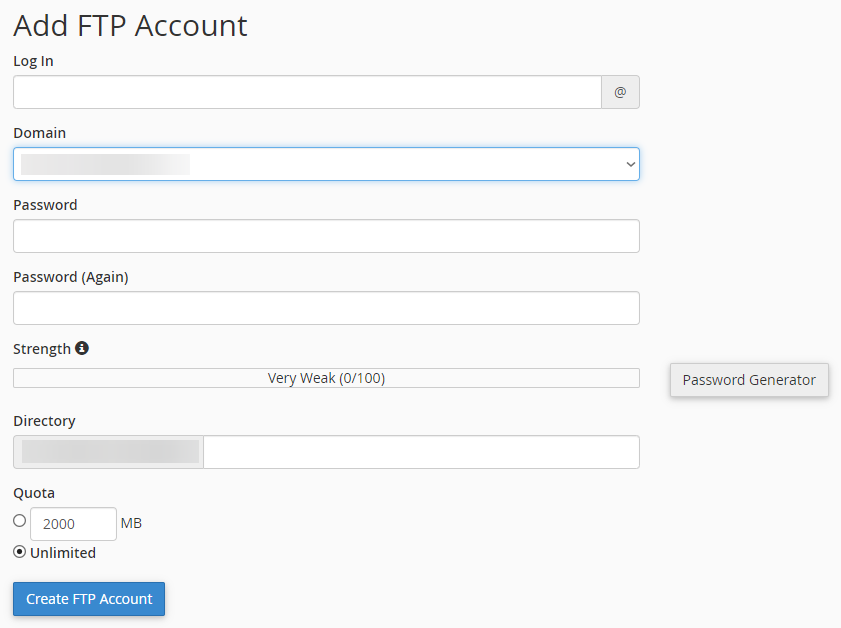
2. Choose your Log In.
3. Choose the Domain where that FTP Account should be associated if you are hosting multiple domains in your Web Hosting Account.
4. Generate a “Very Strong” password. Keep a copy in a safe place locally, or use LastPass as your secure password manager.
5. Specify the Directory where the files transferred via your FTP Account should land. Use your File Manager to create a directory address for you, if you need to.
6. Specify “Unlimited” for your “Quota,” if you don’t want to encounter issues with file uploads.
7. If you are creating an FTP Account for another user in your organization and you want to constrain their uploads for any reason, specify their quota in the field.
8. Use the newly-created FTP Account for the next steps.
Setting Up and Configuring Your FTP Client
1. Under the FTP Accounts section, select the FTP Account you need to set up and click on Configure FTP Client.

2. Download the SFTP Configuration File compatible with your device (Windows or Mac). Always choose the SFTP Configuration File, as this uses more secure protocols than the FTP Configuration File.
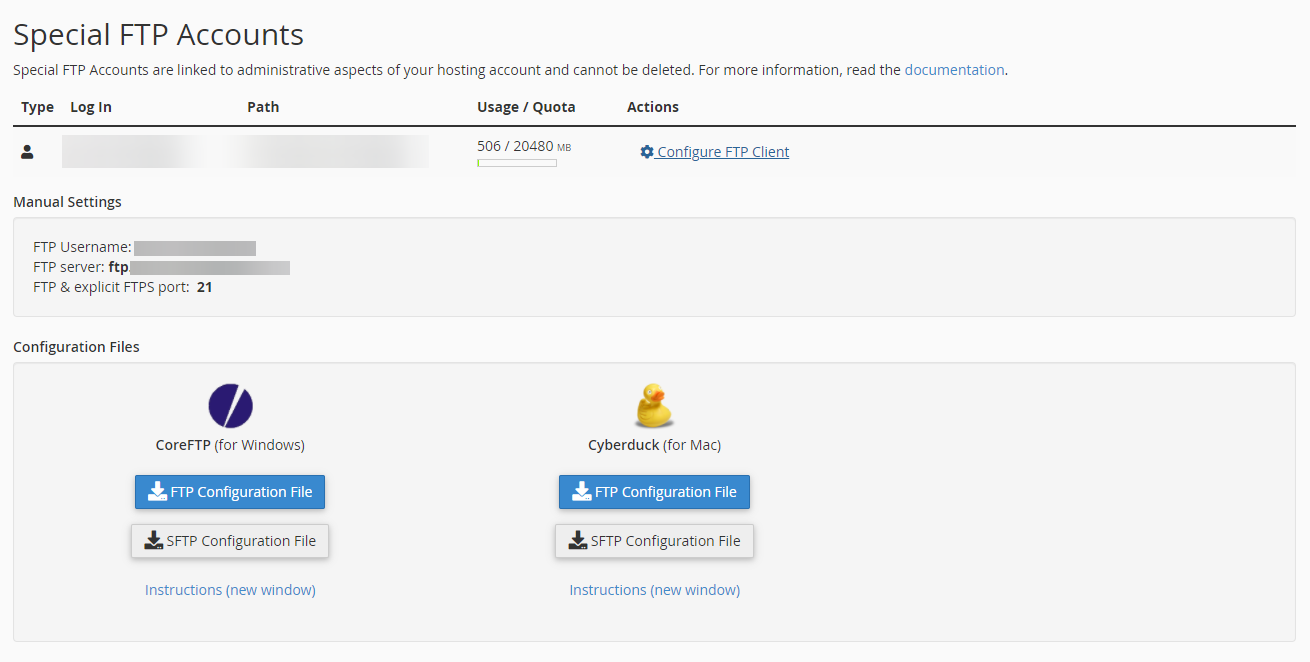
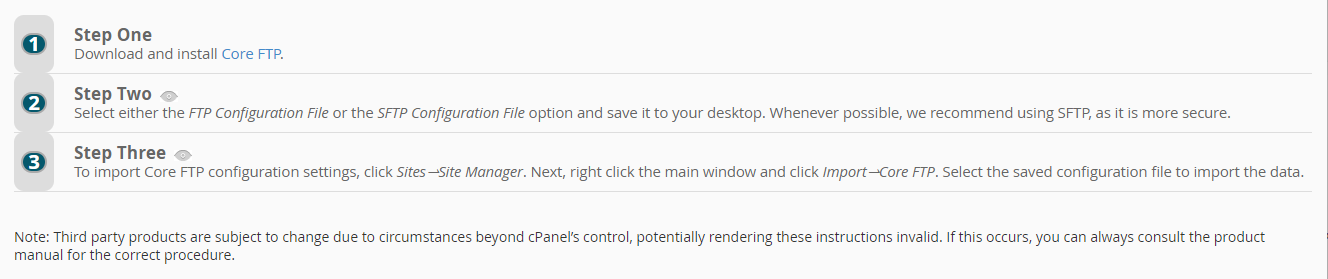
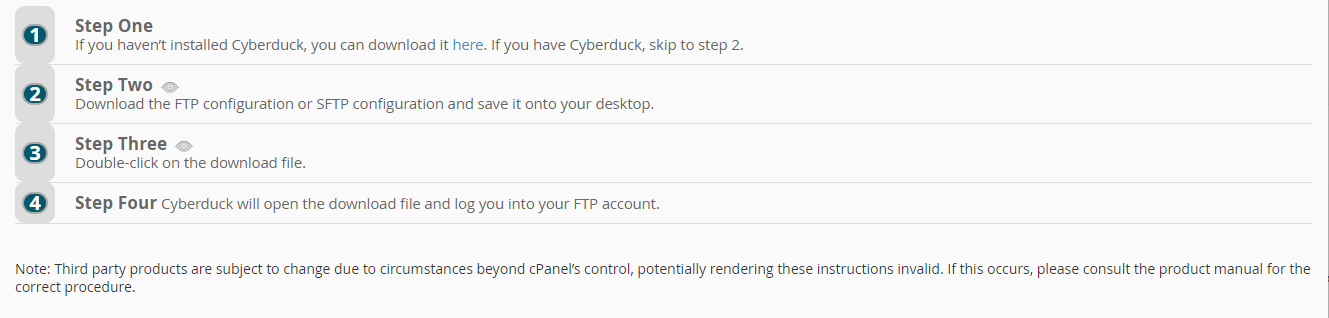
3. Click on Instructions (new window). Follow the instructions specified. For your ease, here’s a copy of the Core FTP and Cyberduck instructions from the cPanel Docs:
- Core FTP Instructions:
- Cyberduck Instructions:
4. After configuring your FTP Client for use with your FTP Account, you’re now good to go with uploads and file management via FTP!
- Take note that some of the WordPress White Screen of Death solutions can be solved using file management through FTP, so it’s really useful to keep an FTP Client configured with your CLDY Web Hosting Account.
Upload Your Files, Directories & Source Codes Using Your FTP Client
After configuring and setting up FTP Client, you can now start to upload your files, directories, and source codes.
1. Go to File > Connect.
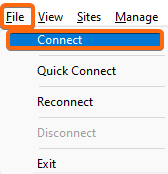
2. Your connection details will already populate because of the FTP Configuration File you imported.
3. Hit “Connect.”
4. You can now go ahead and utilise your FTP client.
Alternatively, you can use this process:
1. Go to Sites > Site Manager.
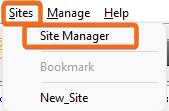
2. If you’re handling multiple websites and accounts, choose the site you need to use.
3. As in the previous process, your connection details will already populate because of the FTP Configuration File you imported.
4. Hit “Connect.”
5. Now, you can proceed with managing and uploading your files after properly setting up FTP client.
In the event that you encounter this error:
“Can’t establish connection –> ftp.yourdomain.com:21,”
Locate the field Host / IP / URL then replace ftp.yourdomain.com with the IP address of your hosting plan. You can find this from your cPanel dashboard by clicking on Server Information, and checking the Shared IP Address field.
![]()
Tip: When you’re done managing your files using your FTP Client, Disconnect before you exit the FTP Client. It’s usually under File > Disconnect, or through the Sites > Site Manager dialog.
There you have it, you can now upload large files, upload multiple files and directories all at once, and upload source codes with less of the restrictions of the File Manager, thanks to FTP!


