
The File Manager feature of your CLDY Web Hosting account is pretty much like your Windows Explorer, PC File Manager (they come in different names and apps on Linux), or the Finder on the Mac. It also functions the same way.
Here’s how you can:
- Create
- Upload
- Edit
- Rename
- Delete
- Restore
Your files using your File Manager, and we will also teach you how to navigate through your directories using the File Manager function.
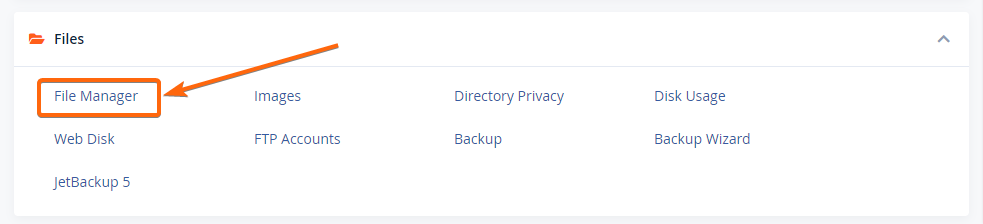
Access Your File Manager Dashboard:
- Log In to your CLDY cPanel.
Usually, the cPanel Web Address can be navigated to through your domain, in this format:
https://yourdomain.com/cpanel - Scroll down to the “Files” section.
- Go into the “File Manager” menu.

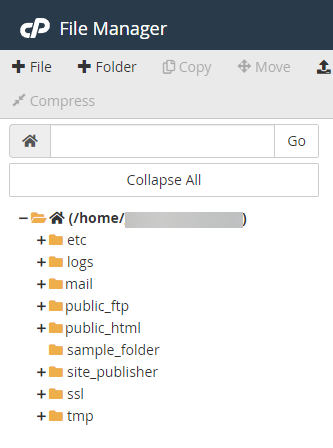
- You will then see the directory tree of your CLDY Web Hosting account.

How to Create A File Using Your File Manager:
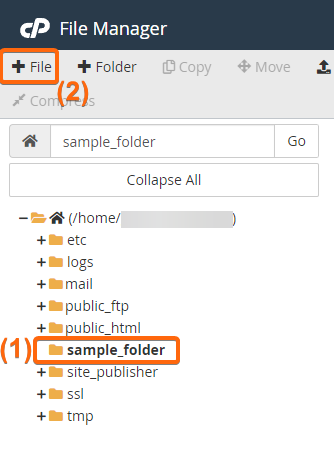
- Select a folder from the Directory Tree on the Left Hand menu.
- When the folder you want is open, locate the +File button on the Top Left area of the Dashboard.

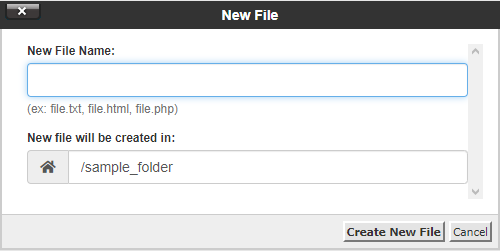
- Specify the File Name on the dialog that pops up.

- Hit “Create New File”.
- Populate the new file with the code or text you need.
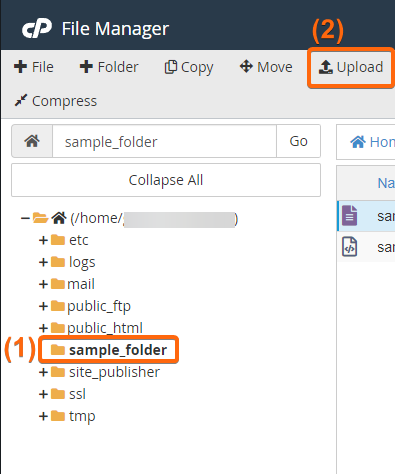
How to Upload A File:
- Select a folder from the Directory Tree on the Left Hand menu.
- When the folder you want is open, locate the Upload button on the Center-Left area of the Dashboard.

- Click the “Upload” button.
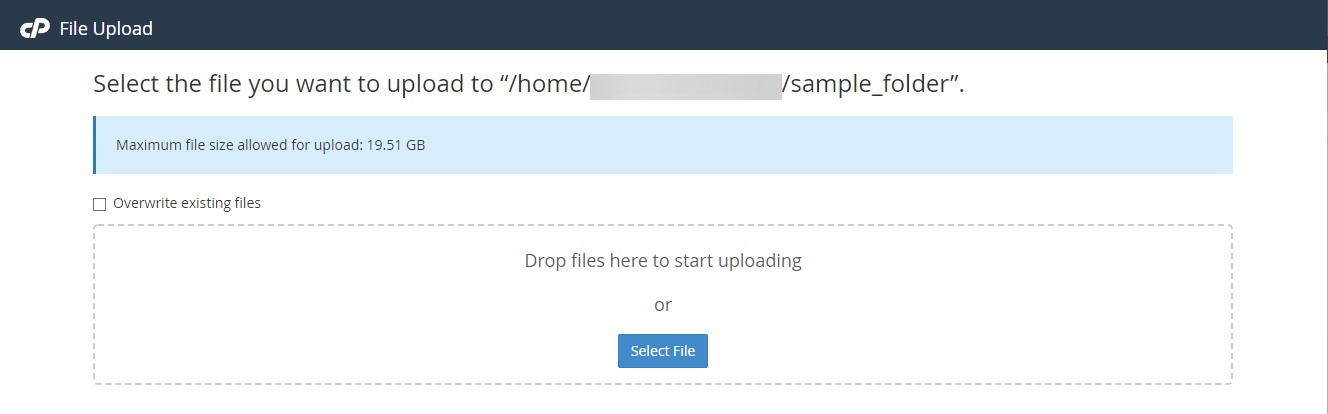
- Select the file that you want to upload. If you’re uploading a different version of the same file, you might want to tick “Overwrite existing files.”

- The Progress Bar will indicate that the upload is at “100%” when the file has been fully uploaded, and there would be a note beneath it that says that uploading is complete.


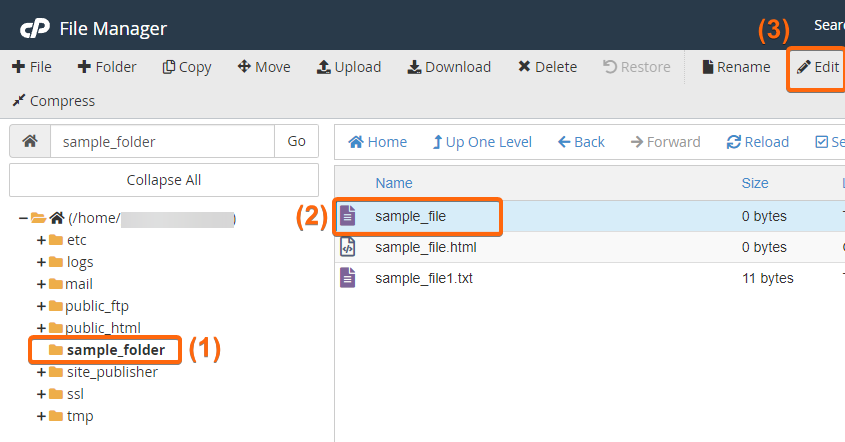
How to Edit A File:
- Navigate to the file you want to edit.
- Locate the “Edit” button, at the Center-Right area of the Dashboard.

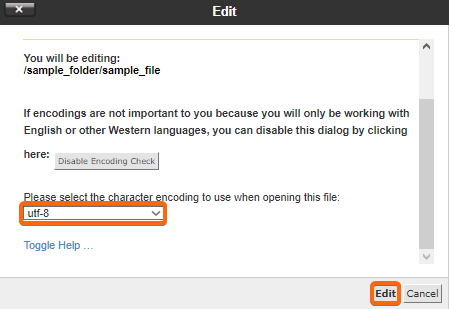
- There will be a dialog box that will pop up, asking what type of encoding you want to use. Specify the encoding that you need.

- Hit “Edit.”
- Paste the source code you want into the blank file if it is blank, or edit the code/text as you wish.


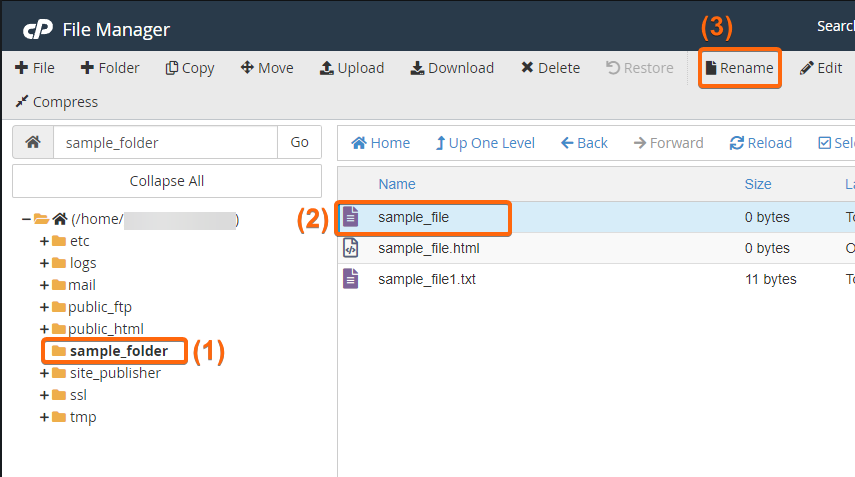
How to Rename A File:
- Click the file on its filename once. You can then rename the file from there.
- You may also highlight the file, locate the “Rename” button from the Center area of the Dashboard, and rename the file via the dialog box that pops up.

- Hit Rename.
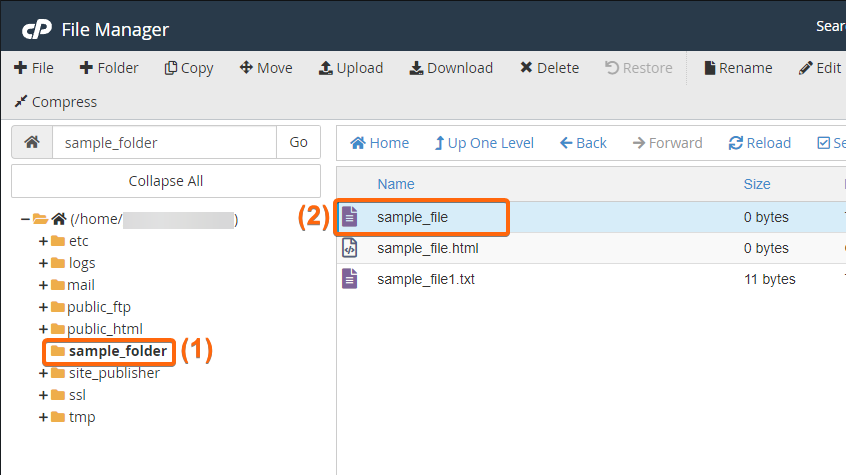
How to Delete A File:
- Highlight the file.
- Hit “Delete” on your PC’s keyboard.

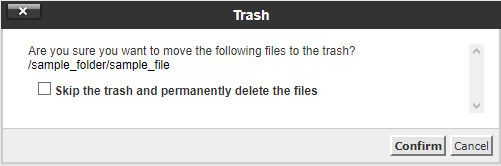
- A dialog box will pop up, asking you if you’d like to skip the trash and permanently delete the file, or just move it to the trash if you’re thinking that you might change your mind later.

- If you want to delete a file with the capacity to retrieve it from the trash later, just hit “Confirm.”
- If you want to permanently delete the file, tick the option to permanently delete it. Take note that you will no longer be able to retrieve the file after you confirm deletion.
- You may also delete a file by highlighting the file, then hitting the “Delete” button on the center of the Dashboard. You may then continue from the steps starting #3 above.
How to Restore A File:
- If you want to Restore your file from the Trash, there is a “View Trash” button on the 2nd Menu Bar on the Dashboard. It’s the second icon from the rightmost.

- Find the file you want to restore.
- Highlight the file.

- Click “Restore” from the top Menu on the Dashboard, in between “Delete” and “Rename.”


If you want to empty your Trash, there’s also an “Empty Trash” button on the rightmost of the 2nd Menu Bar on the Dashboard.
![]()
Other Functions:
- You may also Copy or Move your files from one folder to the other. The buttons are on the Top Left. Take note that you will have to specify the directory path where you’re copying/moving the file, so you would need to copy that information from the file path field on the top area of the menu on the left.

- Aside from Uploading a file, you can also Download a file. Simply highlight the file you want to download, and hit the “Download” button beside the “Upload” button.

- There are a couple of other actions that can cause you to download a file:
-
- When you double-click a file.
- When you highlight a file and then click the “View” button on the rightmost area of the topmost Menu Bar.
- You may also Extract Zip files with the Extract function on the rightmost area of the Top Menu Bar.
- You may also Compress files and directories using the Compress function at the rightmost of the Top Menu bar.
- If your file is an HTML file, there is also a built-in HTML Editor, right beside the “Edit” button. You may edit HTML files using that feature.
- Should you need to modify the permissions for your files, just hit the “Permissions” button beside the “View” button, and you will be able to set Permissions for each file or directory from there.
-
- There is a guide in the dialog box where you can tick the level of privacy for Reading, Writing, or Executing a file.
- Take note that “User” means private only to the CLDY Web Host account user.
- “Group” means that all of the Users in the Web Host account can access the functions specified.
- “World” means public to the world.
- The file’s access levels are specified in this manner:
-
- When the “Read” option is ticked, it means that either the User/Group/World can read the file.
- When the “Write” option is ticked, it means that either the User/Group/World can write to or modify the file.
- When the “Execute” option is ticked, it means that either the User/Group/World can run the file as an executable file or as a program.
- Changing Permissions is useful for errors that may have website conflicts that need to have the Permissions for files and directories modified.
- There is also a Search Bar on the Top Right of the Dashboard that allows you to search for particular files without combing through your whole File Manager. This comes in handy for when you’re looking for one particular file and could not remember or are not familiar with where it’s located.
- When you go to the Settings menu on the Top Right corner, you can set whether File Manager will show you Hidden Files, as well as whether you will be seeing the Character Encoding verification dialogs, which open when you edit a file.
-
- It is also here where you can set which path in the directory that the File Manager will open by default when you open the menu.
As you can see, your cPanel File Manager is just like a local or desktop File Manager. It is feature-rich and user-friendly, and you will be able to modify your site files using it.
Should you encounter complex issues or errors, don’t hesitate to reach out to [email protected] for assistance, and we’ll be happy to help!


