
There are some challenges that come with migrating larger WordPress websites, including longer transfer times and potential data loss during the transfer. In addition, the larger the website, the more resources it may require, including server space, bandwidth, and memory, which may affect the performance of the website on the new WordPress website hosting provider.
It is important to plan and prepare for the migration by ensuring that your new WordPress hosting provider can support the size of the website, conducting thorough backups, and using efficient migration tools and techniques. It is also important to test the website thoroughly after migrating to your new WordPress hosting provider to ensure that everything is working correctly.
Here are the steps you can follow to move or transfer a large WordPress site to a new WordPress website hosting service.
1. Choose a New WordPress Hosting Provider
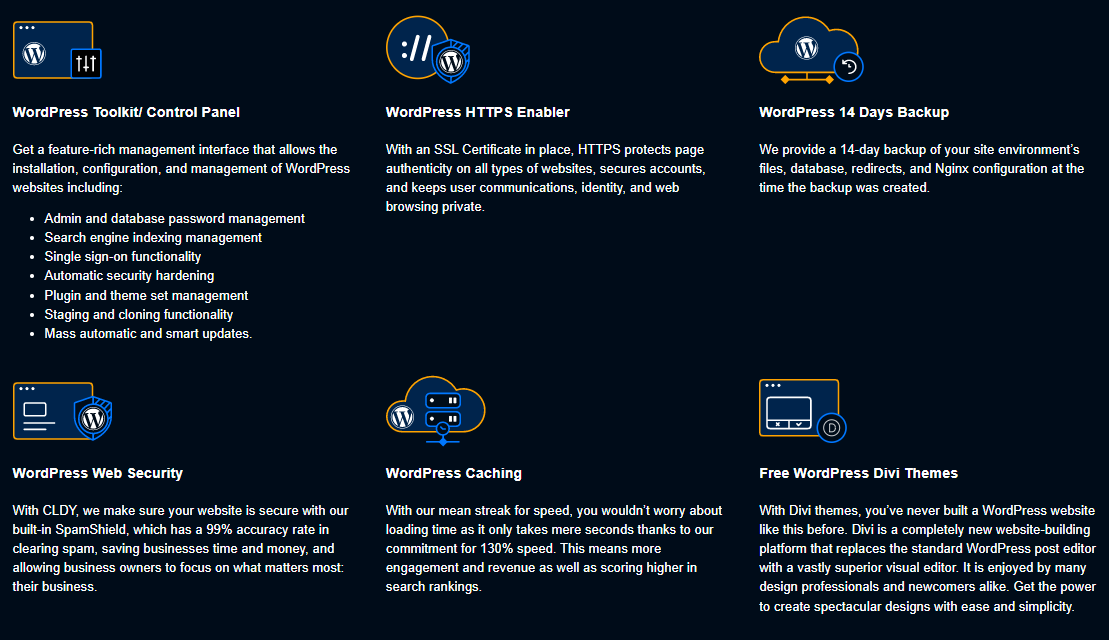
Before transferring your website, you need to select a new WordPress hosting that can accommodate your website. Consider a WordPress hosting service that offers a high-performance server, security features, and good customer support.We recommend selecting a hosting provider that offers WordPress hosting upfront. This way, you don’t have to spend time installing WordPress before starting the migration process. CLDY’s WordPress hosting features your very own toolkit and control panel so you can already familiarise yourself with the backend controls of your website.
2. Create a Backup of Your Website
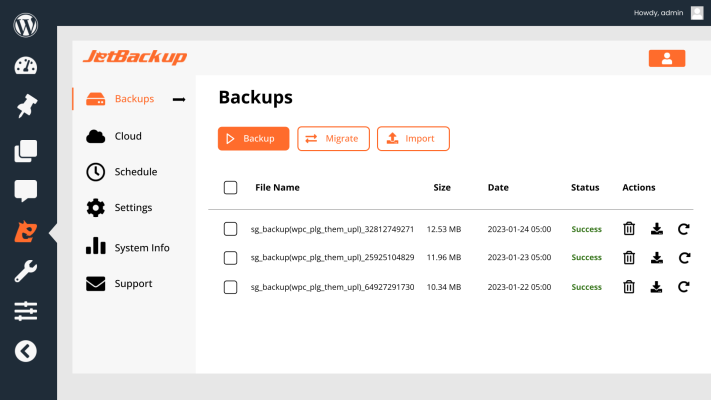
To avoid data loss, create a backup of your website files and database. You can use plugins like UpdraftPlus or JetBackup to create a backup of your website. We recommend that you also download a copy of your website files using FTP as another backup.
3. Set Up a New Database On Your Hosting Account
Once you have secured your WordPress website, you can now start setting up your account with your new WordPress hosting provider. This is the last step before the migration process begins.
4. Migrate Your Website Files
Use FTP to upload the files to the root directory of your new WordPress hosting account. Alternatively, you can use a file manager provided by the new hosting service to upload the files.
5. Migrate Your Database
Export your WordPress database using phpMyAdmin. Import the database to the new hosting account using phpMyAdmin. Make sure to update the database details in the wp-config.php file on the new hosting account.

6. Update Your Domain Name Server (DNS)
Make sure your domain name server (DNS) now points to the new hosting account. This will ensure that your website is accessible on the new hosting.
7. Test Your Website
Test your website on the new WordPress hosting service to ensure that everything is working correctly. Check for broken links, missing pages, or any other issues.
8. Redirect Traffic from Old Hosting
If your website had any backlinks or referral traffic, set up a redirect from the old hosting to the new WordPress hosting. This will ensure that visitors are directed to the new hosting account.
Moving your WordPress site to a specialised WordPress hosting service can seem daunting, but the benefits are well worth it. With a dedicated WordPress hosting account, you’ll receive a tailored service that caters to your WordPress website, including optimised plugins and additional features that enhance its performance and benefit your business.
To learn more about our WordPress hosting services, get in touch with us today and let CLDY help take your website to the next level.


