
For you to be able to use Node.js* applications via cPanel, you will need to run the Node.js Selector. We will help you install this using the methods listed below.
Before you proceed, take note of the following terms used within this article:
- app: application root directory and application URL.
- app.js: application startup file.
- example: username.
- example.com: domain.
- My app: the description.
- 10 or 11: node.js major version number.
Make sure to alter the values as needed depending on the account and the application.
Method #1: Set up the Node.js application using the cPanel interface
Step #1: Create the application
- Log in to cPanel.
- From your cPanel cPanel home screen, go to the Software block and click on Setup Node.js App.

- Click on

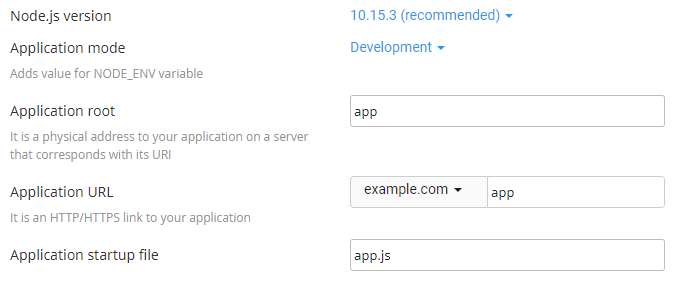
- Complete the following fields on the succeeding page:

- Node.js version: A dropdown will be available for you to choose a version you want to use.
- Application mode: You will have two options: Development or Production. (You can use Development as you start and change this to Production at a later time.)
- Application root: This is the location for your application files. Make sure to append /home/username to complete the path to the application files in the cPanel home directory. (Example locations: /home/username/appname or /home/username/apps/appname)
- Application URL: This is the web address of the application.
- Application startup file: This will be the initial file that will run as the application opens.

- The application should start right away. Click on Open for you to see a test version.
 You should see the It Works! message appear.
By using the package.json settings file and the npm package manager, you can now work on improving the interface of the application itself by following the next steps:
Step #2: Create the package.json file
- Go to your cPanel homepage.
- Under Files, click on File Manager.

- On the left side of the page, click on the application root location (see step 4 from earlier):

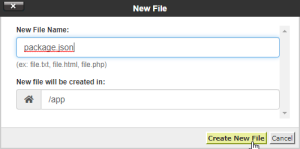
- Click on +File.

- For the file name, type in package.json, and click on Create New File.

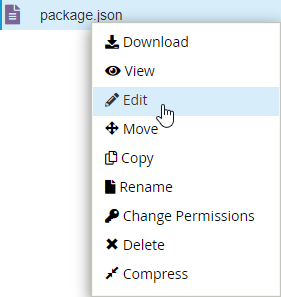
- The package.json file should now be visible. Right-click on the created file and click on Edit.

- A pop-up dialog box will appear. Click on OK.
- On the editor screen, type in the following:
{ "name": "app", "version": "1.0.0", "description": "My App", "main": "app.js", "scripts": { "test": "echo \"Error: no test specified\" && exit 1" }, "author": "", "license": "ISC" } - Click on .

- You can now click on .


Step #3: Install npm
- Once again, go to your cPanel homepage and click on Setup Node.js App. This should be under the Software block.
- Under Actions, click on the pencil (Edit the application) icon.

- Click on

- You should receive a prompt saying that NPM install has been completed successfully.

- On the application setup page, you can choose to “Enter the virtual environment” where you can add and install packages with NPM through SSH login. This command should be visible in the information box within the application setup page.


Method #2: Set up the Node.js application using the command line
If you are more comfortable using SSH than cPanel, these are the steps for you:
- Log in using SSH.
- Use this command to create the application:
cloudlinux-selector create --json --interpreter nodejs --version 11 --app-root app --domain example.com --app-uri app
- This should be the application directory:
cd ~/app
- Create the package.json file using this command:
vi package.json
- From your keyboard, press i to change to insert mode. Add the following text into the editor:
{ "name": "app", "version": "1.0.0", "description": "My App", "main": "app.js", "scripts": { "test": "echo \"Error: no test specified\" && exit 1" }, "author": "", "license": "ISC" } - Press the Esc (escape key) and then : (colon) to switch to command mode.
- Press x and then Enter which will save your work and will let you exit simultaneously.
- Next, install the npm using:
cloudlinux-selector install-modules --json --interpreter nodejs --user example --app-root app
Use this command to add or install other packages with npm: (you will then enter a virtual environment – see step 5 above)
source /home/example/nodevenv/app/11/bin/activate && cd /home/example/app
- As you run the application, here are the commands you can use:stop:
cloudlinux-selector stop --json --interpreter nodejs --app-root ~/app
start:
cloudlinux-selector start --json --interpreter nodejs --app-root ~/app
restart:
cloudlinux-selector restart --json --interpreter nodejs --app-root ~/app
* NOTE : Node.js Selector is only available on VPS hosting.


